 |
Segmented TurningDesign your first segmented project in 5 minutes with the Segmented Project Planner |
||
|
| Products | Classes | Free Plans | Hints | Buy Now | Gallery | Wood Costs | User Projects | FAQ |
| Calculators(
AutoBowl,
Incline Angle, Volume) Color Picker Designers ( Diamonds, Segmented Scene, Vertical Spacers, Blocks, ZigZags, Diamond Borders, Slicer Open Segment) Design Tools (Describe-A-Shape, Design Assistant, Layer Tuner, Shape-A-Bowl, Sketch-A-Bowl) |
Document Generator Named Colors Project Resizer Reports (Project, Cut List, Turned Away, Turning) RingMaster Support |
Segment Designs/Mosaics Segment Images Segment Painting Template Printers (Rings, Segments, Angles) Videos ( Program Usage, Construction) |
Design Assistant - Visual Cues for Perfect Project Shapes
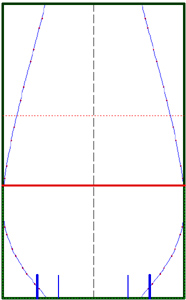 |
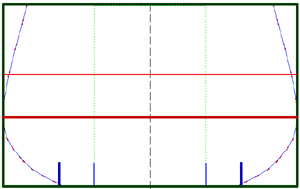
The Design Assistant provides visual cues in Sketch-A-Bowl, Shape-A-Bowl, and the Sketch Pad to help you achieve perfection in your design activities. The Design Assistant provides these cues for three measures of the Golden Mean. If the object measure is far away from the numerically 'perfect' value, the line is dotted. As the object measure approaches the 'perfect' value, the line changes to solid with progressively more width. The color of the line also changes so that it gradually darkens as perfection is achieved. Red, Green, and Blue are used for the three measures so you can readily grasp the three channels of information that the picture is trying to convey. Green shows the overall height versus width situation for an object that is either tall and thin or wide and short. Red shows the two 'perfect' positions of the maximum diameter point. Blue shows the two foot sizes based on the object diameter. Now, let's see what each of the two pictures are telling us... On the left, the dark and wide Green lines agree exactly with the height and width of the object, so we have 'perfection' for this measure. The lower Red line is relatively thick, indicating that the maximum diameter position is close to perfection in the lower portion of the object. The Blue lines indicate we're close to the larger foot dimension, but obviously, not quite there. On the right, the dark and wide Green lines again show exact agreement with 'perfection'; this time in a horizontal layout. You can just make out the dotted Green lines indicating the vertical layout for this object's height. The position of maximum diameter is again in the lower region and the color is a little darker than in the picture above, indicating better agreement with 'perfection'. The wider foot size has been selected and looks more appropriate for a horizontally oriented object. Is use of the Golden Mean required for success? No. Sometimes violating the Golden Mean provides important shock value. Having your design aligned for at least one of the measures, however, improves the likelihood of a successful project. |
 |
Still not convinced? Just give me a call. I'll answer all your questions.

;)