 |
Segmented TurningDesign your first segmented project in 5 minutes with the Segmented Project Planner |
||
|
| Products | Classes | Free Plans | Hints | Buy Now | Gallery | Wood Costs | User Projects | FAQ |
|
|
When you lay out a segmented project, you have three basic choices for how to orient the grain of the wood. The grain can run axially (like a barrel stave), radially, or circumferentially. Here is what you can expect from each one.
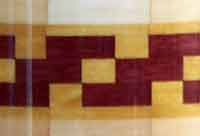
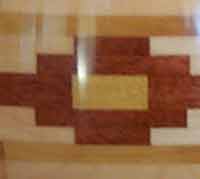
One way to add interest in a project is to introduce thin rings of different color woods. This can be done very simply or you can get very fancy and sort of 'paint' a mosaic type of picture or even use the scroll saw to create segment designs. If you do a thin layer of a single wood type, it will be a lot easier if you begin by gluing it to the wood for its neighboring ring (make a sandwich) and then cut the segments. It wastes a little wood but the joints are much better and it is oh so much easier. If you launch off into the mosaic type of thing, then there is nothing to do but go at one ring at a time. Just be sure to true up the face of each layer as it is glued onto the project.  If you want to add some vertical details in a ring, just pick a width and decrease the size of each segment so that the circumference of the ring is reduced by the total width of all the vertical pieces. When it is all glued together the completed ring will be of the proper size. Or, just tell the Segmented Project Planner to place vertical spacers and set their width. The program will make the segment size adjustments for you.  Somewhere in the design process, you will have to come up with a side/profile view of it. You can do this with a simple drafting program (no, it doesn't have to be nearly as fancy as AutoCAD) or you can sketch it on a sheet of quad lined paper. Then decide on the layers and mark off the wall thickness needed for each layer. The picture below is a sample of what I have produced in the way of a drawing: 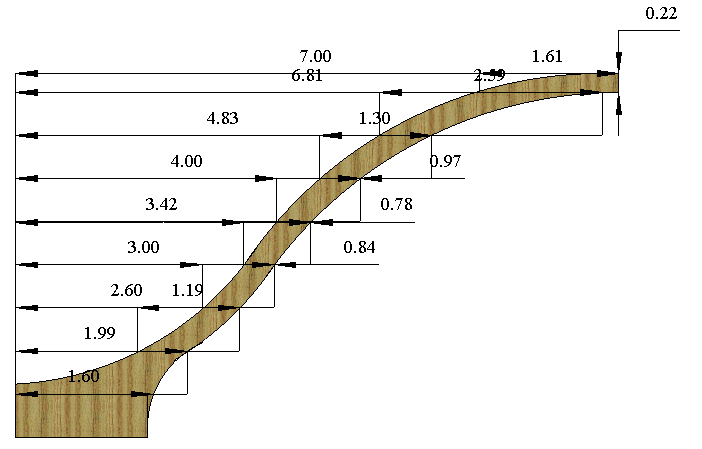 But for those of you who have trouble drawing a straight line with a ruler, like me, the Sketch-A-Bowl function of the Segmented Project Planner comes to the rescue. You begin with a simple starter shape and then push/pull at the sides to get the shape you want. Then set the desired project height, width, and layer height and publish a Segmented Project Planner project. Below is an example: 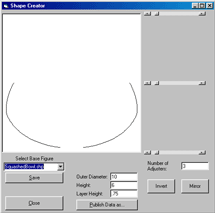 Below are two examples of patterns of the sort you can use to adorn your segmented project. You have to do more work but the result can be worthwhile. Both of these required computing the sizes of the different sized segments and, of course, extra miter setups to cut them. Then you have to glue up really thin rings, carefully flatten them, and carefully align them while gluing them together to make the full design. I used the Segment Design feature of the Segmented Project Planner to create both of these designs.
Another way to add details to your project is what I call the "cookie log" approach. You know the sugar cookies you can get for Halloween or Christmas that have an object inside the cookie? You just cut slices and bake them. There's no reason you can't do the same thing with wood. In Tunbridge, England, they've made a real art of it. Just make a log around your simple design and slice it into pieces that are the thickness of your your wall. Then carefully cut the miter on each side of each piece to form the segments. If you run the grain down the log, you'll have to deal with end grain when you turn it. Or you can use wide pieces of wood to make the log to end up with grain that runs down or across the object. The only tricky part of doing all this is making sure that your design is dead center in each segment. Take a look at my Thunderbirds project in the Gallery to get an idea of what a cookie log implementation might look like. |