|
 Designing a Project Designing a Project
 Translating the Design into Cutting Instructions Translating the Design into Cutting Instructions
 Cutting Segments Cutting Segments
 Gluing and Clamping Rings Gluing and Clamping Rings
 Flattening Rings Flattening Rings
 Gluing up the Project Gluing up the Project
|
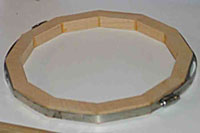
| When you glue up
your first ring; how to clamp it will be a big question. If the ring is
relatively small, say 6 inches or less, a stainless steel hose clamp
does a good job. You can get it really tight and they do not cost too
much. You can also use several large rubber bands for rings up to 10".
If the ring is much larger than that, the hose clamp or rubber band
idea kind of goes south unless you have multiple hose clamps. You can
join two stainless steel clamps together to accommodate a larger
diameter ring. |
 |
For larger rings, I resort to a really simple clamping
mechanism borrowed from the tourniquet. Just take a couple of strands
of sturdy string/twine and make a loose loop around the ring. Then find
something to use as a twister. I use clothespins. Depending on how
strong the string/twine is, you can actually clamp with as much force
as with the hose clamp. Once you have twisted it up tight, use a clamp
or a weight to keep it from coming loose while the glue dries.
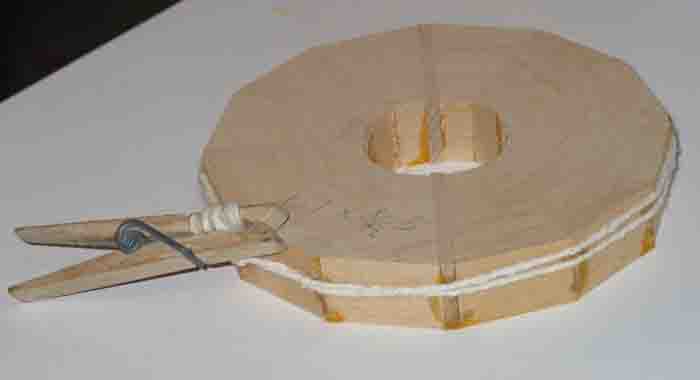
If you take care to match up the corners at each segment
joint, the combination of the uniform forces of the tourniquet clamp
and accurately cut segments will result in a perfectly round ring.
When the clamp starts to draw tight, a hammer becomes a
good tool to try to coerce the segments to lie flat. Just give a whack
to each and every segment while holding the ring down in a flat
surface. You will need to go around the ring three or four times.
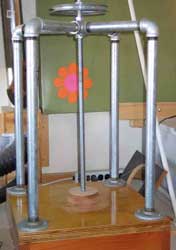
If you are
gluing up a ring that is made up of a sandwich, you will want to pay
particular attention to getting the ring as flat as possible so that
your sandwich layers will not jump up/down as you go around the ring.
In this situation, you will want a ring press. You can construct one
simply by using 1.5" galvanized pipe and a built-up, very rigid, wood
base. Take 4 equal length pieces of pipe and put a 90 degree elbow on
one end and wall mount rings on the other end for fastening to the wood
base. The length of the 4 pieces determines the maximum height you can
clamp because you can use this press for project glue-up as well.
Then add 4 equal length pieces to the elbow ends and screw these into a
4-way connector. The length of these 4 pieces governs the maximum
diameter you can clamp.
Now, the expensive part, drill and tap the center of the 4-way
connector to accept 3/4" x 10 tpi all-thread. Attach some kind of
turning device to the top of the all-thread and make yourself several
cauls to use on the bottom end of the all-thread to distribute the
pressure onto your ring/project. You will only need to leave a ring in
the press for a half hour or so and then you can move on to the next
ring.
I had a lot of wobble in my all-thread so I used JB Weld to attach a
nut to the top and bottom of the 4-way connector to stabilize it. |
 |
When clamping solid rings (the segment's long side is
the same as the radius) be prepared for trouble no matter how
accurately the segments are cut. The culprit is moisture from the glue,
which causes the tips to expand. There are five ways I know to limit
the effect:
- Clamp tighter; but you're working against an
irresistible force
- Get all the segments glued and into the clamp as
quickly as possible before the water can do its thing
- Try using a glue that is not water based
- Glue only one or two joints at a time; taking care to
keep excess glue away from the joints not yet being glued
- Forget the whole thing and use a plug in the middle
of a wide ring
A glued up ring can be somewhat tender. I have yet to
break one in normal handling and flattening, but dropping one on the
floor is another story. A thin ring with the grain running around the
circumference will be the weakest because all of the joints will be end
grain and glue starved.
|