 |
Segmented TurningDesign your first segmented project in 5 minutes with the Segmented Project Planner |
||
|
| Products | Classes | Free Plans | Hints | Buy Now | Gallery | Wood Costs | User Projects | FAQ |
|
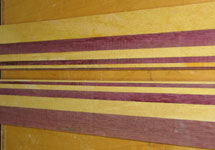
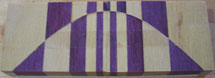
Below are pictures of my project for October 2004. I've gone a little bit 'art deco' on this one. The piece, dubbed Sequences, has a feature ring composed of Yellowheart and Purpleheart. The two colors are arranged horizontally in accordance with the Fibonacci series (1,1,2,3,5,8,13,21, etc.) which models the growth of a population of rabbits. The second series is the Sine function. Picture 1 shows the pattern which will be repeated 6 times around the project. The first step of construction is to mill the pieces making up the Fibonacci series. To the nearest 1/32" I first sawed the needed widths on the bandsaw and then used my drum sander to dimensionally sand them down to the proper thickness. To increase the accuracy of this process to 1/64" I did the measuring with one piece of each color stacked on another of the same thickness. I ran both pieces through the sander side-by-side so that the thicknesses would be the same. After gluing up two sticks with the color usage reversed and a little surface finishing, Picture 2 shows my blanks. |
||
 Picture 1 |
 Picture 2 |
|
|
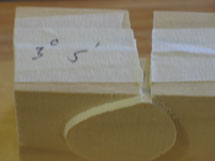
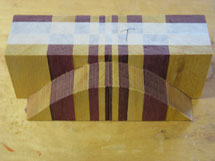
This is going to be a stacked cut on my bandsaw, so my first step is to cut the two sticks into 24 equal length pieces, carefully stack them so that the tops are really the tops and and that the patterns are aligned between the two layers of each stack. Then I run masking tape around the sides to hold them in position. I'm setting them up to be cut in pairs to make the bandsaw work simpler. Then I glue the design template to the top surface, making sure that the template is positioned to match the pattern in the sticks. Picture 4 shows the stacks ready for cutting. Before I can cut the design, I need to set the tilt angle on the table saw. For me this is a trial and error sort of process. I know that the proper tilt will be in the neighborhood of 3 degrees for material that is 3/4" thick. My sticks were just shy of 7/8", so I'll have to play a little. I do this by taping up a stack of 3/4" Pine and doing a quick circle-ish cut. If I've got the tilt right, the upper cutout will snugly fit into the lower recess just shy of 7/8" below the bottom of the piece. After two tries it was close enough as you can see in Picture 4. Now hold your breath and start cutting. Slow and easy does it. Don't push the process or you'll push the blade out of alignment. Picture 5 was a very gratifying result. I couldn't have asked for more. |
||
 Picture 3 |
 Picture 4 |
 Picture 5 |
|
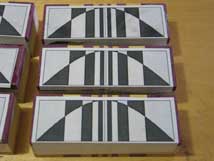
Flushed with success, I pressed on to cut the remaining 5 pieces. Picture 6 shows the result. How good is the fit? Picture 7 is a close-up of one pair of segment blanks just pushed together; no tape, etc. Looks pretty good. Next step; number all pieces of wood so I'll be able to get them back together later and glue the cutout into the recess of each mating piece. Once dry, I can tape them back together into pairs and do the final triming on the table saw. After trimming, Picture 8 shows my 12 segment blanks ready for their miter cuts. |
||
 Picture 6 |
 Picture 7 |
 Picture 8 |
Want to look at one of my previous projects? Just Click Here...
