 |
Segmented TurningDesign your first segmented project in 5 minutes with the Segmented Project Planner |
||
|
| Products | Classes | Free Plans | Hints | Buy Now | Gallery | Wood Costs | User Projects | FAQ |
|
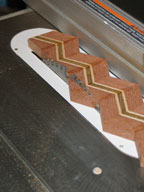
Below are pictures of my project for March of 2004. This is my first attempt at making and using a lamination that I'll use as the primary part of a feature ring. This particular example starts out with a 1/4" strip of Zebrawood, I think, in the middle. This is flanked on either side with a 1/8" strip of Maple. Then, on the outside, two strips of Lacewood that are 7/8" wide. According to the math and Lloyd Johnson's Lamination Pro, I'll need some 50" of board to make my 12 sided, 10" diameter feature ring. The first step after milling the materials is to glue up the lamination board. I milled enough materials to give me 69" of board, so there ought to be plenty. Picture 1 shows the lamination board all clamped up and using all the clamps of this size I have. Norm Abrams is right; you can't have too many clamps. After letting this set for about five hours, I couldn't wait to see what it really looked like. Picture 2 shows a portion of the completed lamination board after a few passes through the surface planer to clean it up. Tomorrow I'll start making slices. |
||
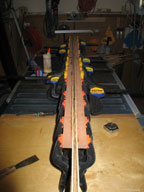 Picture 1 |
 Picture 2 |
|
|
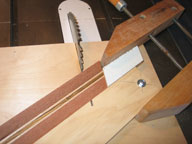
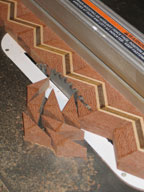
Now it's time to start cutting. The first step, Picture 3, is to set up the miter sled at the appropriate angle and clamp on a stop-block at the right length. For this project I'll use a 30°angle which will end up giving me 60° diamonds lying on their sides. If I used 45°, the result would be squares standing on point. Using a 60° angle would give me 60 degree diamonds again; this time they would be tall and narrow. The stop block is set to give me 1.5" wide strips. After cutting 26 pieces, this part of the exercise is complete. I need 26 pieces because my ring will be 12 segments, each segment takes 2 pieces, and I'll lose 1 pair of segments in the final cut and glue. In Picture 4 I have the slices put back together in a trial fit just to see what it is going to look like. Notice the section of ruler above the pieces. I'll assemble the pieces next to this straight edge to make sure that the pattern in my completed glue-up forms a straight line. When I completed cutting the strips I had ~9.5" of material left; so the initial length estimate was correct. Because of space limitations in my garage shop, I'm gluing up the zigzag in two parts initially. Then I'll put them together later. Picture 5 shows this initial glue-up in clamps. The straight edge came in handy for making sure that the pattern stays in a straight line. Measuring these two pieces gives me a total material length, for 26 segment halves of 39.125". That leaves just over 3" per segment less losses due to the saw blade. |
||
 |
 |
 |
|
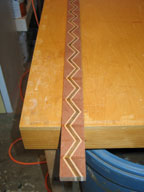
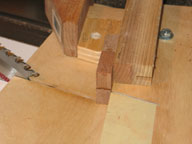
It's trimming time! Picture 6 shows triming one side of the glue-up just enough to get rid of the jagged edges. In Picture 7, the other side of the glue-up is being trimmed. In Picture 8 we have the piece after trimming. |
||
 |
 |
 |
|
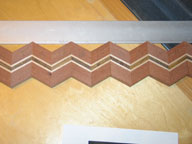
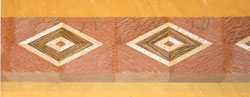
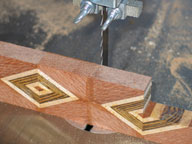
The next step is to carefully measure, mark, and cut the piece in half. I did this with the band saw to minimize how much of the pattern I would lose due to the blade with. In Picture 9 we finally see what the final product will look like. I've sliced it in half with the band saw, shaved the ragged edge with the table saw, and laid the two halves back together with one slid 1/2 pattern to form diamonds. These two diamonds look very good. Some of the others did not. And it seemed to go south at the joint between the two parts shown in Picture 5. So the moral of that story is to find a way to glue up the zigzag as one gluing session. But it's fixable. I cut the two pieces into four parts; one containing perfect diamonds and three containing diamonds that were a little lop-sided. Then I trimmed the insides of the halves containing too much material to match their mates. That took just a couple teensy trims off the inside of the big side of each pair. Then find the narrowest half, set the saw for that width, and trim all the outsides to that dimension to center up the diamonds. Now, before I have a chance to change my mind, glue all the halves to their respective mates while making sure that the points line up as much as possible, Picture 10. The little bit of inter-unit sawing I did for the tuning exercise shows me that I'll be able to get a length of about 2-15/16" for each unit. I'm planning for segments that are just under 2-3/4" long, a 10" ring, so everything is coming together nicely. It's now time to cut the lamination into individual pieces. In Picture 11, I'm free-handing it. |
||
 |
 |
 |
|
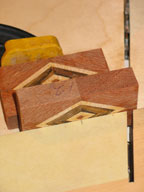
Ok, now we have 12 perfect pieces of segment material, Picture 12 I'm going to cut the segments in two steps. In the first step I've measured off 2-23/32", my actual segment size, divided that by 2 and marked the center point on my miter sled. You can just see the tick mark in Picture 13. For each piece, then, I place the center of the piece at the tick mark, clamp the piece against the miter fence, place a backer board behind where the saw will cut (I left this out so you could see the setup), and make the cut. Then I set a stop block for the full 2-23/32" to the right of the blade and proceeded to cut the other side of each segment, Picture 14. Again I used a backer board behind the piece to minimize chipping at the rear edge of the piece. |
||
 |
 |
 |
|
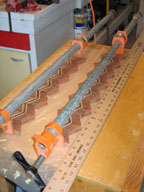
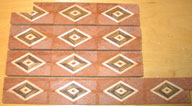
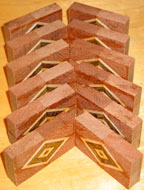
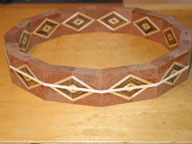
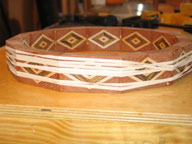
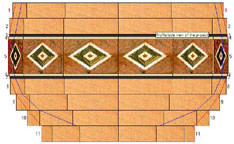
With all 12 segments cut out, I can't wait to see how I did. Picture 15 is the proof. I even managed to get the diamonds to just kiss on the inside! I can't think of anything else to do at this point but glue it up. In Picture 16 the glue is drying and the ring is securely clamped via my favorite clamps, rubberbands. Now, just where am I planning to use this feature ring? Good question! Picture 17 shows it very nicely. I've taken my Navajo bowl design as a starting point. I resized the feature ring down from 2-1/4" to 1-5/8", added 1/8" layers of Maple and Ebony above and below the ring of diamonds, and did a little tweaking of the ring sizes immediately above and below the ring of diamonds. You may ask how I got the picture. I took Picture 9 and trimmed it down to just one segment worth of diamond, shrunk the result down to 3/4" wide at 200 dpi (150 x 79 pixels), and painted the ring with the picture as a Segment Image. I also used a digital photograph of raw Cherry to paint the other rings of the bowl. The actual picture shown here is from the Layer Tuner dialog of the Segmented Project Planner. |
||
 |
 |
 |
