 |
Segmented TurningDesign your first segmented project in 5 minutes with the Segmented Project Planner |
||
|
| Products | Classes | Free Plans | Hints | Buy Now | Gallery | Wood Costs | User Projects | FAQ |
|
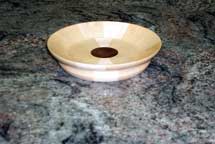
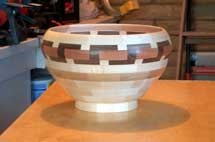
Below are pictures of my project for October of 2002. This is the proof project for the new Sketch-A-Bowl feature of the Segmented Project Planner. The first step in the design process, shown in Picture 1, is to come up with a shape for the project. I started with a half-circle shape and tugged a little here, pushed a little there, until I was satisfied with it. I then decided upon its overall dimensions and published the result as a .spr file for the Segmented Project Planner. Then, in the Segmented Project Planner, I applied the AutoBowl function to set the wall thicknesses in each layer. Picture 2 shows the resulting initial plan for the bowl. I wanted a sort of indian motif for this bowl. A popular one has a dark color, usually black, snaking its way above and below a band of red. Using the Segment Design capability of the Segmented Project Planner, I created a pattern to simulate this effect. In Picture 3, you see two adjacent segments worth of the pattern. |
||
 |
 |
 |
|
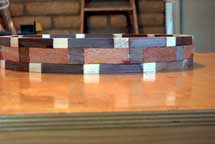
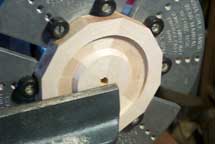
Now to apply the Segment Design to the bowl. I collapsed layers 2 and 3 into one layer at 1.5" tall and painted all the segments of this layer using the Segment Design. After a little more tinkering with wood selections for the rest of the bowl, Picure 4 shows my final plan. Normally, my first step in a new project is to make the base layer. But I was anxious this time to see what my indian motif would come out looking like. Picture 5 tells the tale. As you can see, this ring is constructed as three layers instead of the four depicted in the Segment Design above. I'm taking advantage of the design characteristics to make it easier to construct. The top and bottom layers are the same and alternate 3-3/4 degree and 11-1/4 degree miters of Maple and Black Walnut respectively. The central layer is twice as thick and alternates 3-3/4 degree and 11-1/4 degree miters of Black Walnut and Mahogany respectively. After carefully flattening all three rings and making sure the center layer is exactly 1/2" thick, I put the sandwich together. I'll do the final sizing of the top and bottom layers when I get ready to attach this piece to the bowl. The next step in the construction is to make and prepare the base. Most of my base layers are nearly solid rings and I usually use a router to cut out the recess for my chuck. This time I cut the recess on the lathe instead to make a cleaner bottom. Picture 6 shows the bottom with the finished recess. |
||
 Picture 4 |
 Picture 5 |
 Picture 6 |
|
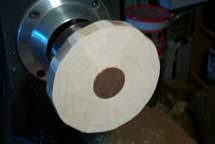
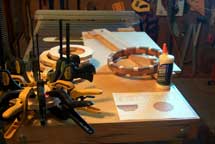
Now, I change the jaws on the chuck, turn the bottom around, and put in a plug of a contrasting wood color. I used a forstner bit to make the initial hole and followed this up with my small skew chisel to get the hole just the right size. Picture 7 shows the plug glued in place. Note, the ring has also been rough turned so that ends of the segment joints describe a true, centered, circle to facilitate getting the next layer nicely centered on this one. Now I start to roll. Picture 8 sort of represents the entire project. In the front-left corner is the first layer sandwich consisting of the base and the layer just above it. In the front-right corner is the project plan. In the mid-ground are the remaining simple rings on the left and the indian motif built-up ring on the right. Behind all of it is my miter sled. I bet you didn't expect this one! I lost track of the shape of the bottom interior of the bowl and chiseled right through the side at the juncture between layers 6 and 7. Not wanting to throw anything away that can be salvaged, this is what the remaining base became. Perhaps it will look good with some truffles on it! Back to the Segmented Project Planner to give layer 7 a little more girth and I can salvage this project by making a new base and layer 7. The junction between the new layer 7 and what was left of layer 6 is wide enough to proceed with no other changes. |
||
 Picture 7 |
 Picture 8 |
 Picture 9 |
|
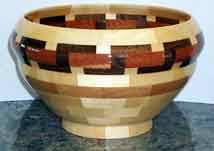
It's about now that the urge to finish gets to me and this time is no exception. Picture 10 shows the project with all turning and sanding complete. All that remains is the finish. Picture 11 shows the project almost complete. The finish has been applied and now needs to cure a month or so before the final rubbing out. |
||
 Picture 10 |
 Picture 11 |
|
Want to look at one of my previous projects? Just Click Here...
