 |
Segmented TurningDesign your first segmented project in 5 minutes with the Segmented Project Planner |
||
|
| Products | Classes | Free Plans | Hints | Buy Now | Gallery | Wood Costs | User Projects | FAQ |
|
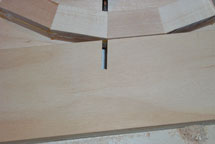
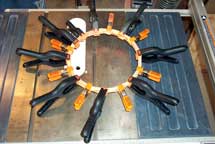
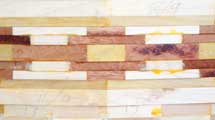
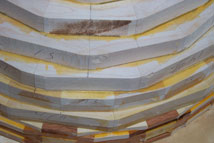
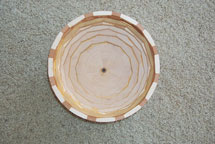
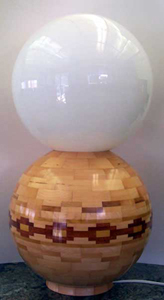
Below are pictures of my project for June of 2002. I have a 70's vintage "Touch Lamp" that has long since lost its touch-on/touch-off capability. It consists of a white, 12" globe sitting on top of a chrome column that is about 5" in diameter. My idea for this project is to create a 12" segmented sphere as a new base to go under the 12" globe. This is my first project making significant use of the new Segment Design capability of the Segmented Project Planner. It features a 1-1/2" band around the middle built up from a 6x6 segment design and two checkerboard rings. The base wood is Maple with the accent pieces coming from Mahogany, Birch Heartwood, and Yellow Heart. Since I'm attempting to make a true sphere, the process starts with a drawing shown in Picture 1. A significant difference in this drawing is that it does not call out the widths of the segments in each layer; the measurements consist of only the outer diameter for each layer. I used the new AutoBowl function of the Segmented Project Planner to convert these dimensions into those used in the program to compute segment widths and lengths. Picture 2 shows one of the glued up rings that make up the Segment Design band around the middle. It shows a slightly different use of the tourniquet clamping method. I had to do it this way because the ring was too thin, 1/4", to do my standard tourniquet method. In Picture 3 we see the center ring of the band around the middle of the sphere with two sandwich rings under it along with a couple of sandwiches for making the checkerboard ring and the segments for making the four other rings needed to make up the center band. In quilting, this use of sandwiches is known as "strip piecing". |
||
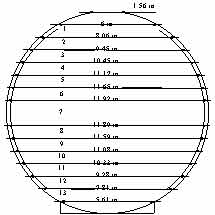 Picture 1 |
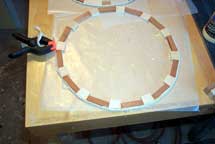 Picture 2 |
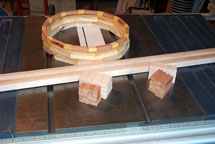 Picture 3 |
|
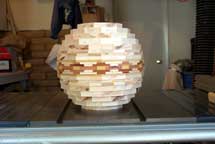
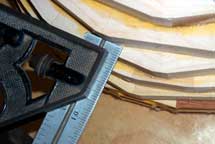
In Picture 4, I've stacked up all 19 rings of the project to see what it will look like. I haven't done the flattening work yet, so it's a little taller than it will be in the end. The next step is a long session on the drum sander to get the layers flat and the right height. While I was doing the flattening, I discovered that I had made a mistake while assembling one of the checkerboard rings. In a section where the contrast between the two wood types wasn't that significant, I managed to get one segment up side down. Bummer! My wife came up with a solution. She said, "Why not cut out the bad segment and glue in a replacement". Well, it worked. I cleaned up the outsides of the joints on either side of the bad segment so it would lay flat against the miter fence, cut one side, flipped the ring over, and cut the other side. Then I glued in the replacement and finished up the flattening exercise. Picture 5 shows how you would set up for the first cut and Picture 6 shows the repaired ring. You might be able to just make out the slightly wider glue joint. |
||
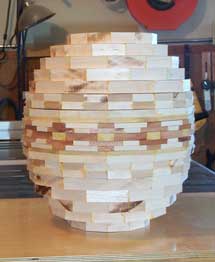 Picture 4 |
 Picture 5 |
 Picture 6 |
|
Norm Abrams ("The New Yankee Workshop") is fond of saying that you can never have too many clamps. Picture 7 speaks volumes on this subject while gluing together the first two sub-rings in the central band around the sphere. Now, three glue-ups later, the central band is complete and at its proper thickness in Picture 8. In Picture 9 I've stacked the whole project up again to get another look before I start gluing layers together. It's a bit more spherical now. |
||
 Picture 7 |
 Picture 8 |
 Picture 9 |
|
Pictures 10 and 11 show one way of getting each new layer properly centered as you glue up the project. In Picture 10 you see that I have marked the center of some segments in each layer; specifically 4. I have also done a minor bit of turning after each layer is glued on to get back to a true circle. Using the centering marks as an initial positioning device for the next layer and then double-checking and adjusting as necessary with the Combination Square gets good results. With this method I have been able to easily get each layer to within 1/16" of centered. As an alternative, I tried seeing how a 30 degree cone chucked up in the tail stock would do for centering. My initial finding is that 30 degrees is not a steep enough angle. One of these days I'll try a 45 degree cone. There comes a point in a project of this size that layer-to-layer clamping no longer works because there is nothing to hang on to. So, you then have to resort to other means. In Picture 12 we see one way of doing it. I've laid two 2x4's across the base of the project which I have placed in the middle of my extra extension leaf for the table saw. Then I have used a pair of "Quick Grip" clamps on each board to clamp the whole thing down against the table. |
||
 Picture 10 |
 Picture 11 |
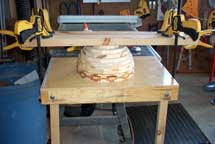 Picture 12 |
|
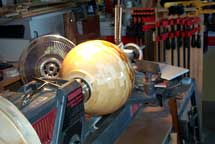
Now that I'm half way through the layer glue-up, I can't resist the urge to find out what my Segment Design band is really going to look like. Here it is in Picture 13. And Picture 14 is included just to show what the inside of this beast looks like. Since none of this will be visible in the finished product, I'm going to leave it just this way. Now I'm off to glue up the rest of the layers. Well, I finished up the gluing, including a little cap piece to act as a steady rest in the tail stock, and about 4 hours later I have it turned to final shape (Picture 15). During this exercise, I actually got up the nerve to turn my bowl gouge up on its side and make some fully supported cuts while resting on the bevel of the chisel. |
||
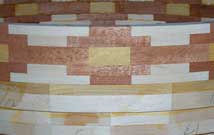 Picture 13 |
 Picture 14 |
 Picture 15 |
|
A couple hours of sanding and about four coats of Varathane later, Picture 16 shows the globe as I build up the finish in preparation for the final sanding. The intent here is to apply several coats so as to fill up all grain and cracks, sand it down to a super smooth and even surface that will not show joint lines, and then apply one final coat. During the last coat I retimed my slow-speed attachment and found that it was actually 4 seconds per revolution. A great speed for smaller work but a little fast for a 12" monster because you can't get a good look at coverage while it is spinning. Picture 17 shows the finished item. |
||
 Picture 16 |
 Picture 17 |
|
Want to look at one of my previous projects? Just Click Here...
