 |
Segmented TurningDesign your first segmented project in 5 minutes with the Segmented Project Planner |
||
|
| Products | Classes | Free Plans | Hints | Buy Now | Gallery | Wood Costs | User Projects | FAQ |
Below are pictures of my project for December of 2001. This one is a segmeted bowl that is based on the ComplexCurves plan you can see in the Plans section of this site. The base wood is a selection of Birch heartwood I obtained when Home Base went out of business. The other woods appearing in this piece are Purple Heart, Yellow Heart, Walnut, and Rosewood. Picture 1 shows the piece after layer 4 has been glued on. This layer was constructed by using a sandwich of Purple Heart and Yellow Heart with adjacent segments turned over to give a checkerboard pattern. At this point, layers 1, 2, and 3 have already been shaped to what is likely to be their final form. I'm shaping each layer before proceeding with the gluing of the next layer. Picture 2 shows layer 6 attached. This layer started as a sandwich consisting of two pieces of Rosewood and one of Yellow Heart which was then cut into segments and glued into the ring shape. The checkerboard layer, number 4, has been turned to its final form and layer 5 is turned to about where it will end up. Picture 3 shows the sandwich layer, number 6, turned and blended into layer 5. Layer 5 has been flattened a little. Now we have layer 7 in the glue-up step. There is enough difference between the sizes of the base and the current layer that bar clamps don't do so well anymore. So, I'm using the lathe itself as the clamp. The side effect of this is that now I'm done for the day. You, of course, know that I planned it that way! |
||
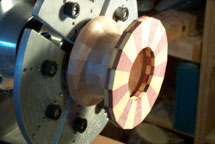 Picture 1 |
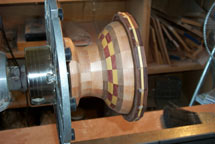 Picture 2 |
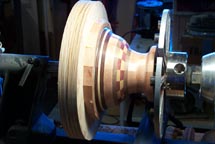 Picture 3 |
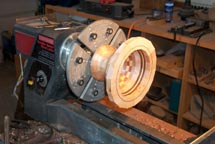
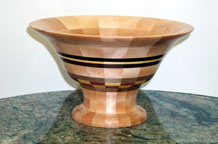
Picture 4 shows the project chucked up again ready to turn layer 7. Note that I have scribed the inner diameter of the next layer on the surface of layer 7 as a guide for how much to carve from its inside surface. In Picture 5 we now have the inside of layer 7 carved to match the previous layer at the bottom and the scribe mark denoting the inside of the next layer to come. The outside of layer 7 has been carved similarly. You'll see that the wall thickness is a bit much at this point. I got a little thin in layers 4 and 5 so I'm going a little carefully at this point. Although there are three more layers in the plan, its starting to look like maybe just one more will be enough. I'll revisit this issue after layer 8 is processed. Well, layer 8 has been turned and I've decided that the piece is done. Picture 6 shows the unfinished but finish sanded result. I'm getting lots of oohs and ahs from my sweetie on this one! |
||
 Picture 4 |
 Picture 5 |
 Picture 6 |
Remember that I said this project was based on the Complex Curves plan? Well, it was, and it wasn't because three things happened:
So I spent another 10 minutes, measuring what I actually constructed and changing the plans. Now there is another file in the Plans section you can use. This one is called Complex Curves Bowl-2. As you can see, this looks a lot more like what actually got made. |
||
