 |
Segmented TurningDesign your first segmented project in 5 minutes with the Segmented Project Planner |
|||
|
| Products | Classes | Free Plans | Hints | Buy Now | Gallery | Wood Costs | User Projects | FAQ |
|
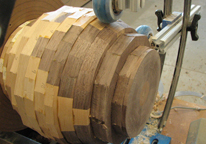
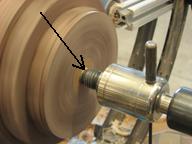
Your segmented project is well underway. Several layers are stacked on the lathe. It's perfect! Then you start to think about turning the piece around to finish off the bottom. "Did I prepare for turning the project around in the lathe?" Oops! But all is not lost. You can find the center of the project's bottom and set it up for driving from the headstock. Here's how: The first step is to turn a cone section, (Picture 1) near the base, with the narrow part of the section facing the headstock. You want it near the base for accuracy in placement of the center and the taper needs to be in that orientation so that a steady rest, not only holds the project centered on the lathe, but also provides pressure to hold the project against the driver. Then mount a steady rest with the wheels running on that cone section. Lock everything down sugly so it won't move (Picture 2). I'm using the Carter steady rest and its feature of being able to move it on the ways of the lathe without losing the center of rotation locationis important to this process. |
||
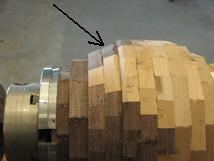 Picture 1 |
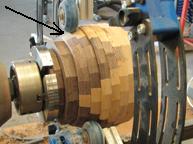 Picture 2 |
|
|
Now mark the location of the project in the chuck so you can put it back in the same place later on. I've used a pen to mark both ends of the No.1 jaw of the chuck (Picture 3). Now, remove the project from the chuck, dismount the chuck, and mount a drive mechanism (Picture 4). I'm using a faceplate with a flat MDF circle attached. A conic section mounted in the chuck that will self-center into the top of my project would be even better. The top of my project was surfaced smooth with no wobble, so this will rest solidly on the MDF. The steady rest gets moved to position its wheels on the tapered section of the project (Picture 4). After playing around with it for a bit, the project is resting flat against the MDF and the steady rest wheels are holding the project centered and lightly pressing against the MDF (Picture 5). |
||
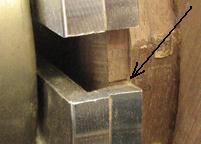 Picture 3 |
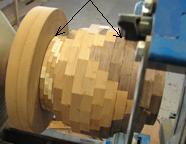 Picture 4 |
 Picture 5 |
|
Now my One Way Live Center is brought into position with its center point removed. The project is virtually perfectly centered with less than 1/64" off center. The Live Center is locked with its pin to prevent rotation and pressure is applied to cut a circular groove in the bottom of the project (Picture 6). This configuration is how I'll reverse the project later when I'm turning the outside bottom section. Now you can break it all down and put the project back in the chuck exactly where it was to start with. The truncated cone on the tailstock, and the index marks I made before de-chucking help make sure the remount in the chuck is perfect (Picture 7). |
||
 Picture 6 |
 Picture 7 |
|
Want to look at one of my previous projects? Just Click Here...
